


Amazon 101: How to Bulk Upload with File Feeds
One of the most tedious tasks on Amazon is uploading a file feed. A file feed is a bulk upload that can be done to create and update listings, as well as update parent/child ASIN relationships. File Feeds may feel confusing, but Macarta’s Senior Analyst Dan Logan is here to help explain how to understand file feeds for efficient catalog management on Amazon.
Getting started
The most important part of creating file feed is selecting the right category and sub-category for your product.
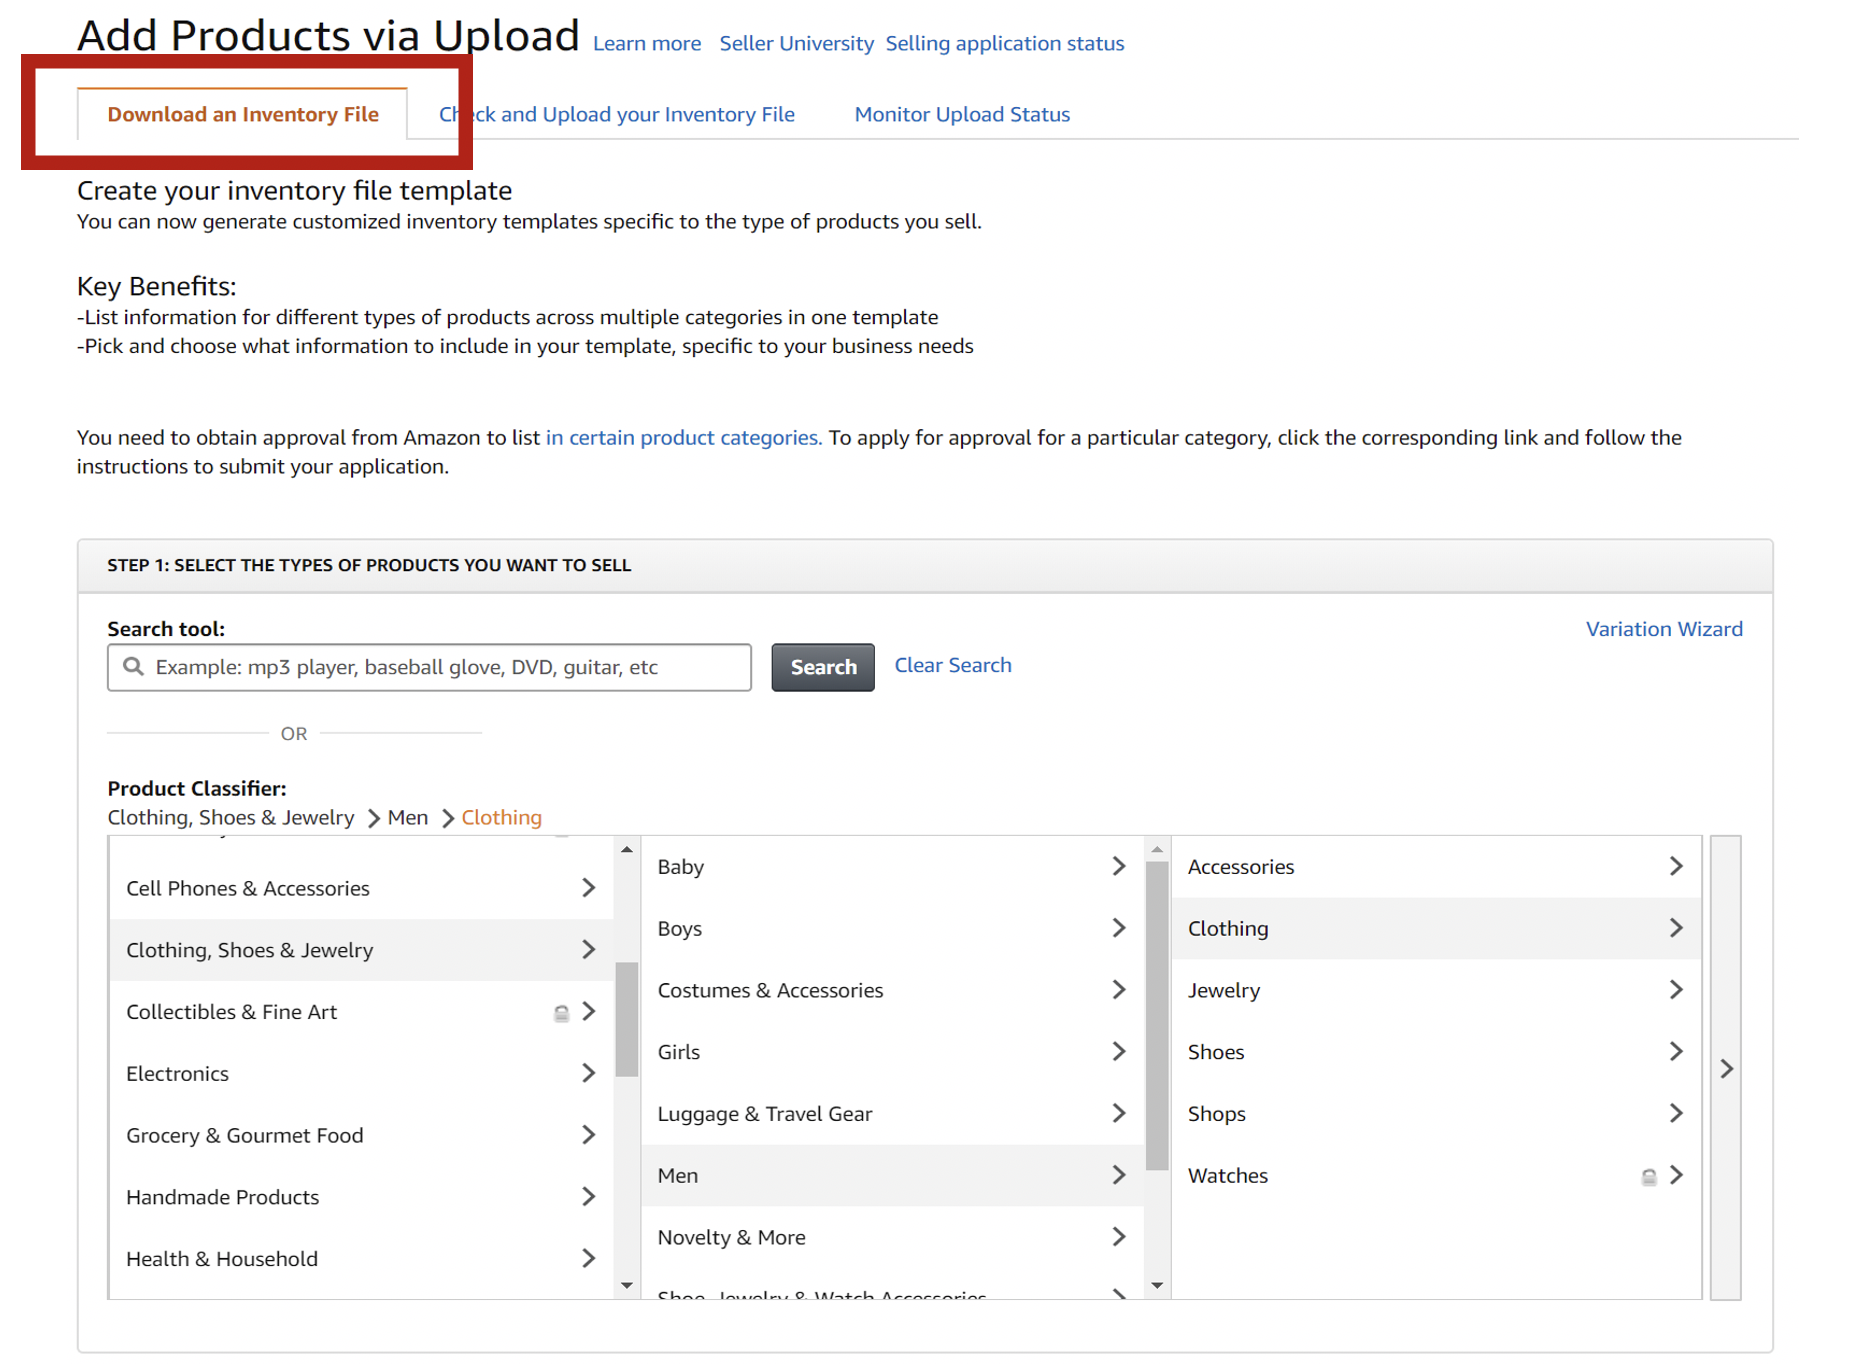
- Inventory > Add Products via Upload > click on “Download an Inventory File” tab.
- Click on the main category for the product and click through until you find the closest sub-category and click the select button.
- Click “Advanced” then “Generate Template” to download the template for your selected sub-category.
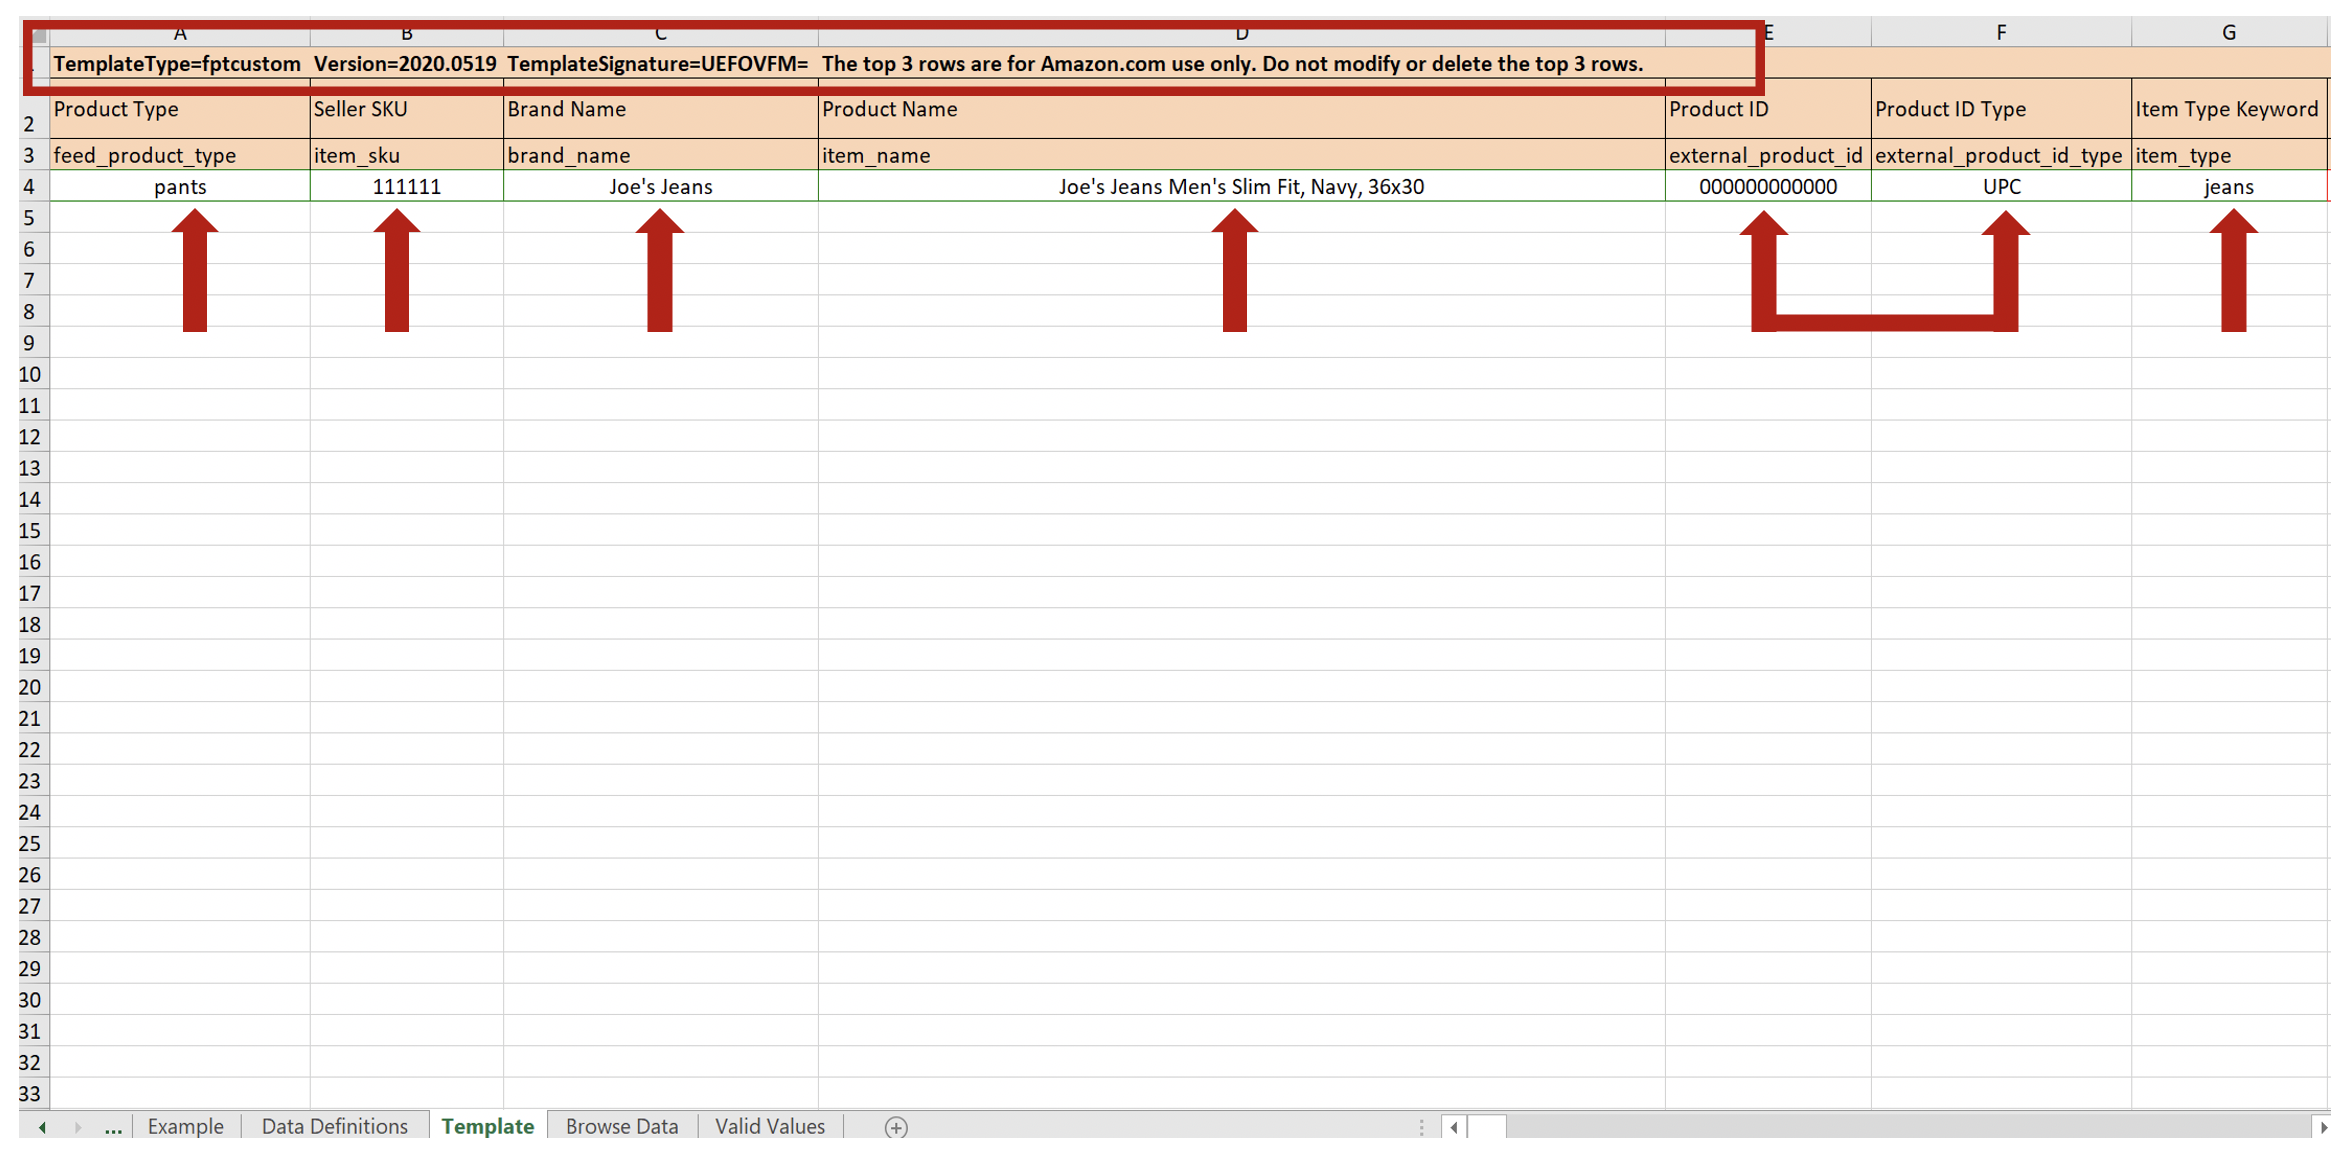
Open the file and go to the “Valid Values” tab. This tab is crucial for familiarizing yourself with the required information in order to successfully submit a feed file. Copy and paste the feed_product_type and item_type in the same columns in the Template tab.
Completing Your File Feed
- Enter your desired item_sku and the brand name of the product being listed.
- Include the product title as it will be displayed on the listing page.
- If listing with a UPC, add in the UPC into the external_product_id column and enter “UPC” in the external_product _id_type.
- If listing with an ASIN, add the ASIN into the external_product_id column and enter “ASIN” in the external_product _id_type.
- Scroll to the right and enter in the item_price under the standard_price column and the quantity in the following column.
- Scroll to the department name and enter “mens”. This will show the gender that this item fits on the listing page.
You can either upload as is or continue with the following information in order to fully create your listing with all important information.
Creating Parent/Child Variations
Variations are a great way to give customers multiple product options on one listing page. After uploading a few file feeds, you’ll get the hang of how to get these created quickly and easily.
Parent/Child Variations with a File Feed:
- Enter a parent SKU below the child item SKU.
- Choose a parent name that clearly shows you what the product line is to make it easily identifiable and easy to add child SKUs to it
- Add in -Parent to the end of the parent SKU to make it easy to find them in file feeds and in Manage Inventory (e.g. Slim-Fit-Mens-Jeans-Parent)
- Choose a title for the parent that also describes clearly what items are going to be listed under. For most categories the parent title is the name shown at the top of the listing page. (e.g. Joe’s Jeans Men’s Slim Fit Jeans).
- Copy the follow info from the child SKU
- Enter in the following information for each product listing being created (not needed for parent listings):
- Feed_product_type
- Brand_name
- Item_type
- Department

- Enter in the following information for each product listing being created (not needed for parent listings):
- Color_name (the product color) In this case, we can enter “Navy” into the color_name column. For the color_map, we can enter Blue because it’s the most closely related basic color to blue. For size_name and size_map we can enter 36×30 as this is the size of the jeans.
- Color_map (see “Valid Values” tab)
- Size_name
- Size_map
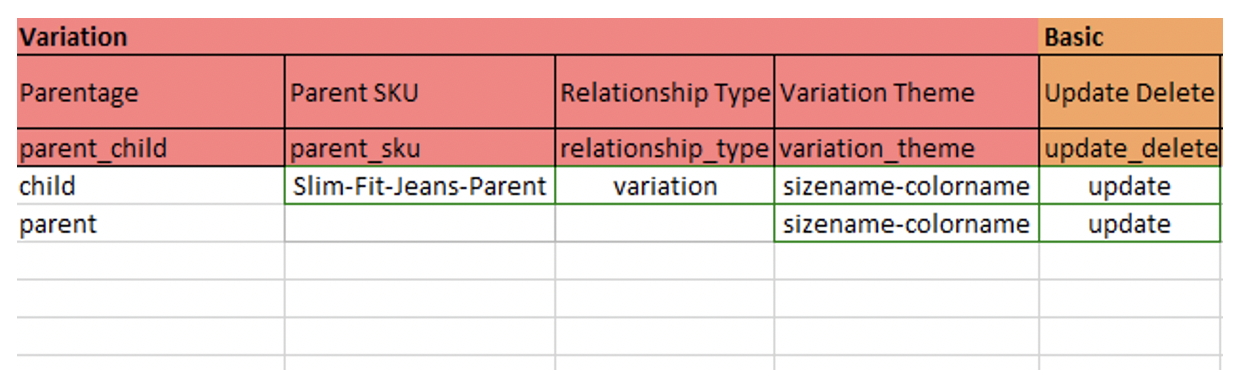
- Scroll to the right until you see the Variation header in red. This is where the remaining variation info will be entered.
- In the parent_child column enter either parent or child depending on which item is in that line.
- Enter the parent SKU under the parent_SKU column and “variation” under the relationship type only for child listings.
- For the variation_theme, see the valid values. This column is to set up the variation using either the size, color or both. The most common theme is “sizename-colorname” when listing product with multiple sizes and colors.
- Enter “update” for all listings being created under the update_delete column.
Now it’s time to upload your file and create the listings and parent/child variation:
- Go back to Seller Central and then navigate to Inventory > Add Products via upload.
- Click on the Check and Upload your Inventory File tab.
- Use the Check your file tool to check for any errors before you upload the file to Seller Central.
- Use the upload file tool to get your listings and parent/child variation created.
- Once uploaded, click on the Monitor Upload Status tool to see when the file upload is completed.
- Click on the Download Your Processing Report to check for errors, if there are errors, follow the notes included in the file to make any changes and upload the file again as needed.
Congratulations, you’ve now created your first parent/child variation!
Even with a comprehensive guide, creating file feeds and parent/child variations can cause issues. Try the following if you encounter errors:
- Check that all of your information is accurate.
- Create a case file with Seller Central to resolve any disputes.
- Check Amazon Seller University on YouTube for helpful video tips.
- Hire a team of experts…we’d be happy to help.
Need help with your catalog? Drop us a line: